Sunday, March 11, 2012

JAB's Glitter Midge

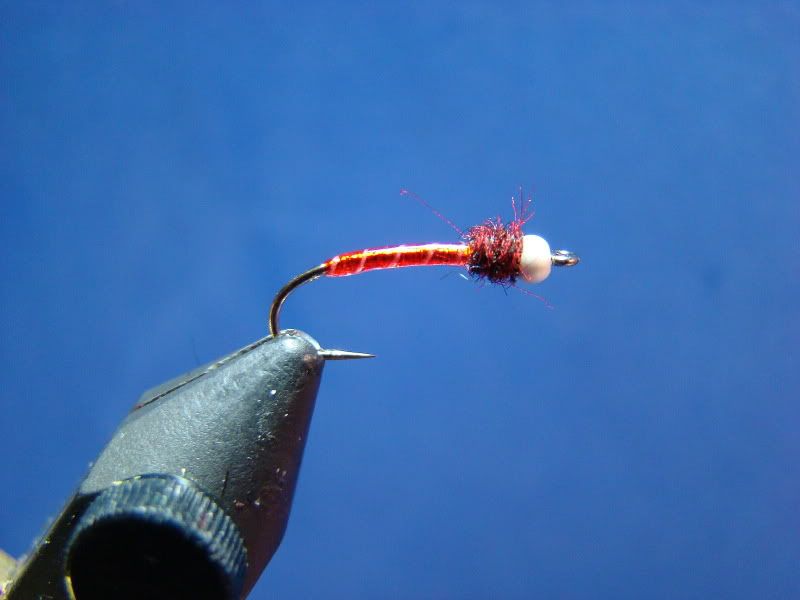
I was doing a little experimenting with the camera's macro feature and software package this afternoon...  I figured out how to blow up pictures for more detail!  As a result, I decided to tie some smaller midge patterns and share the results.  Let's a take look at a pattern that is not only simple, quick, and fun to tie, but bomb-proof, sink quickly, and pretty darn deadly. 

My original JAB's Glitter Midge utilized epoxy for the coating however, since various ultra violet light reactive resins have hit the scene I have strictly utilized them- mainly Clear Cure Goo due to it's very clear finish.  These resins save a tremendous amont of time at the bench; which, equates to more time on the water or for preparations for the extended trip.

Materials:

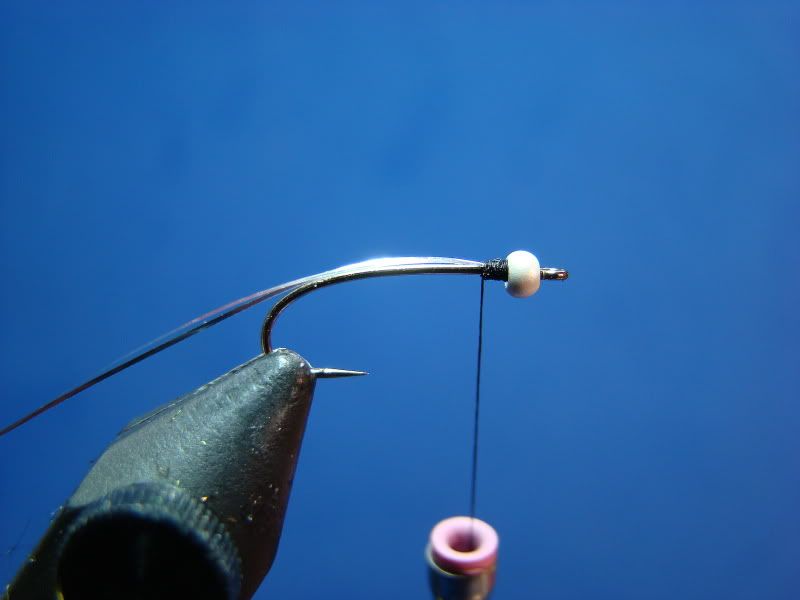
Hook: Daiichi 1260 (size 12-16)
Thread: 8/0 for sizes 12 and 14, 12/0 for size 16 (Color of choice)
Body: Thread covered with Clear Cure Goo in two steps. Fine Glitter.
Throax:  Thread covered with Clear Cure Goo in two steps
Gills: (Optional) Oral-B dental floss.  I will be tying a larva pattern- no gills.
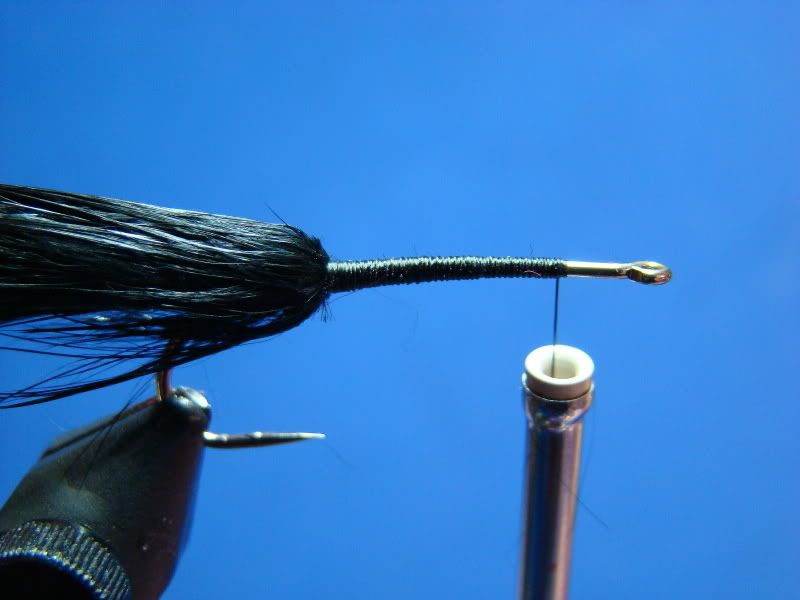
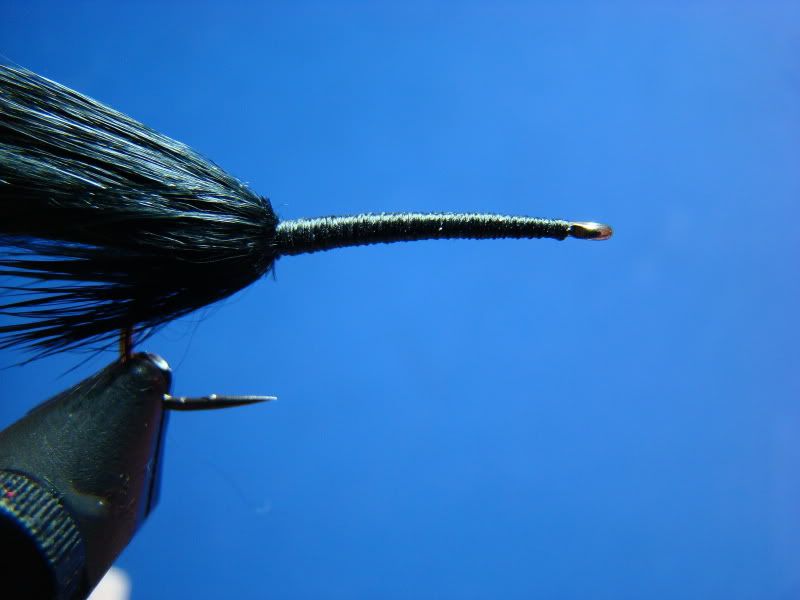
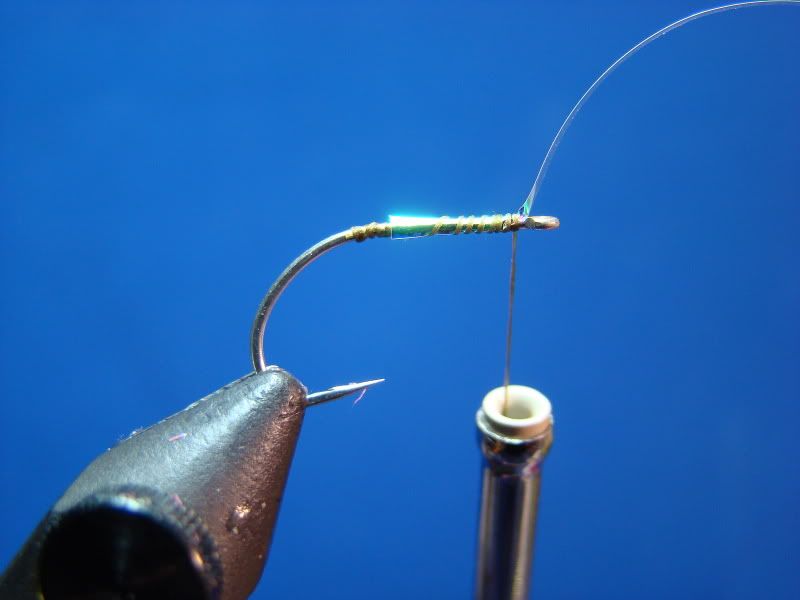
Step 1

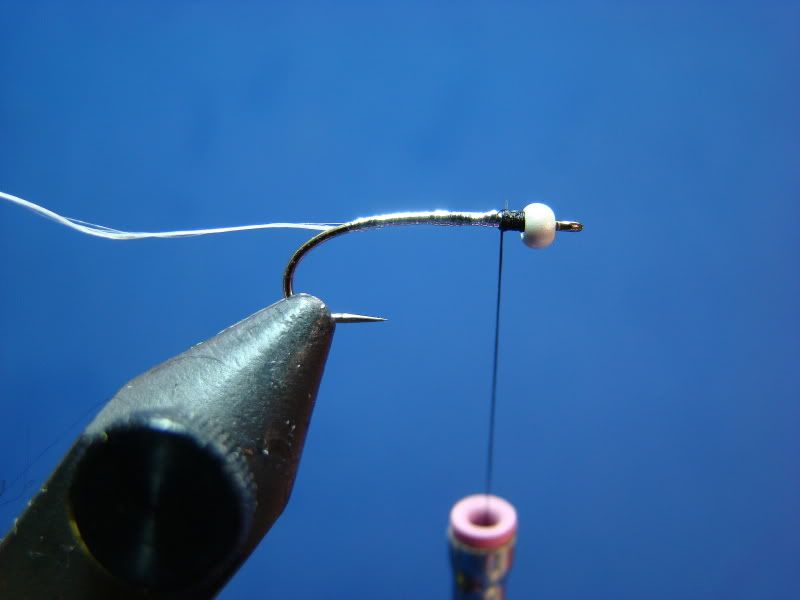
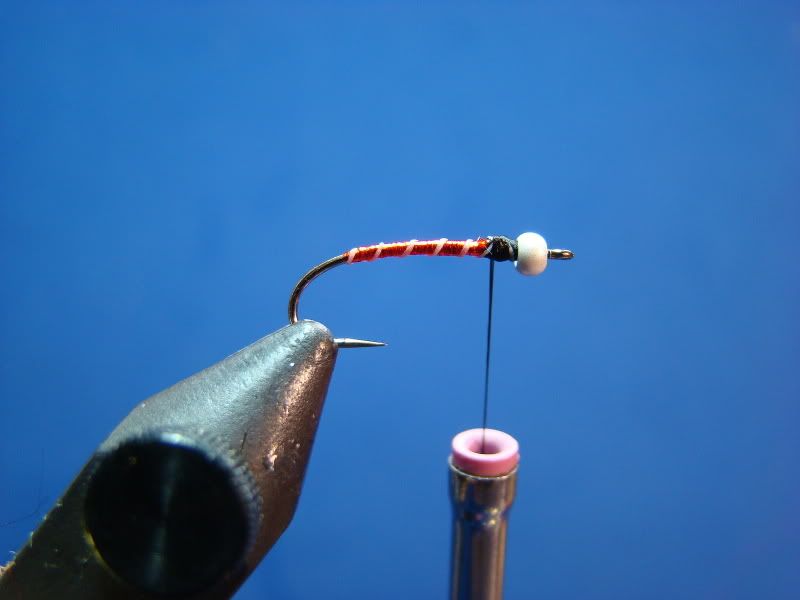
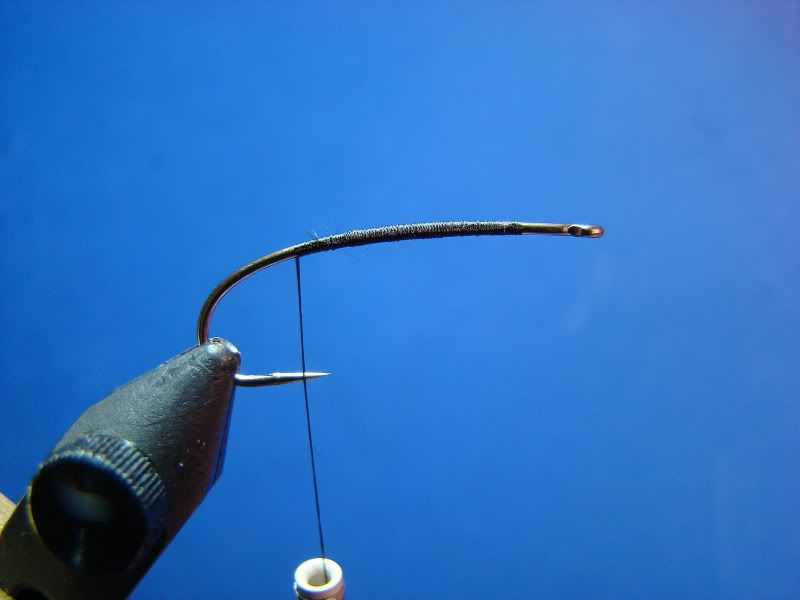
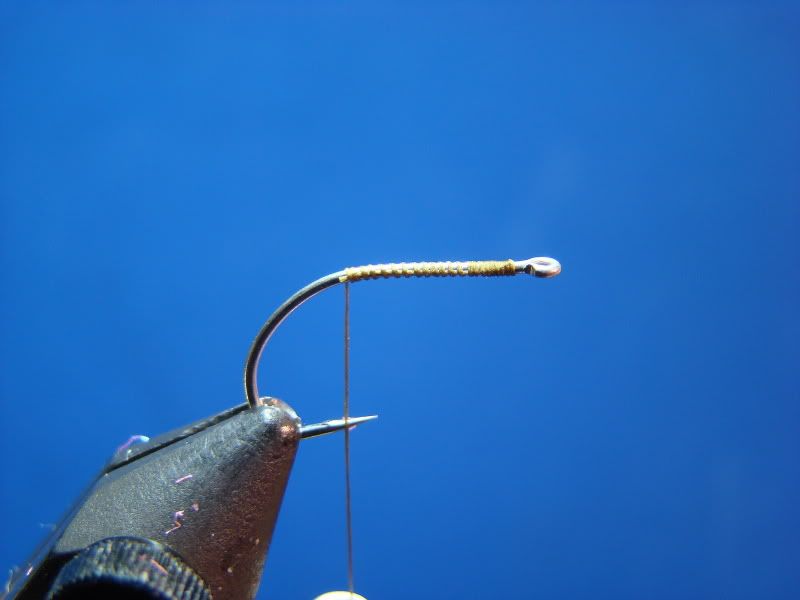
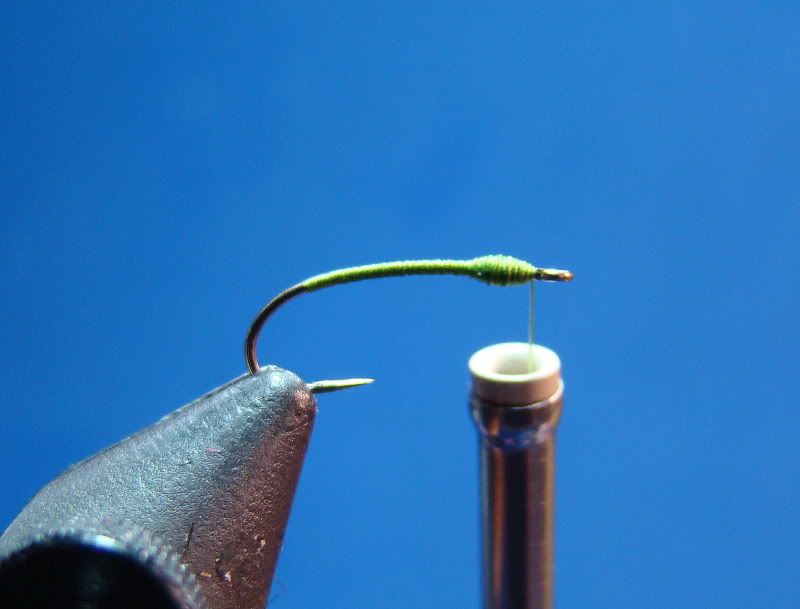
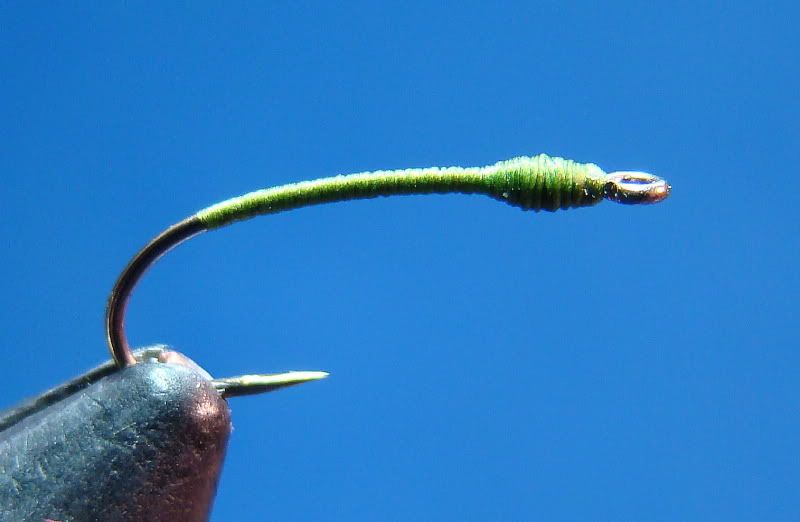
Wind thread rearward to a point just above the hook barb and return to a spot approximately two eye lengths behind the eye.


Step 2:

Build up a thread thorax area as pictured.
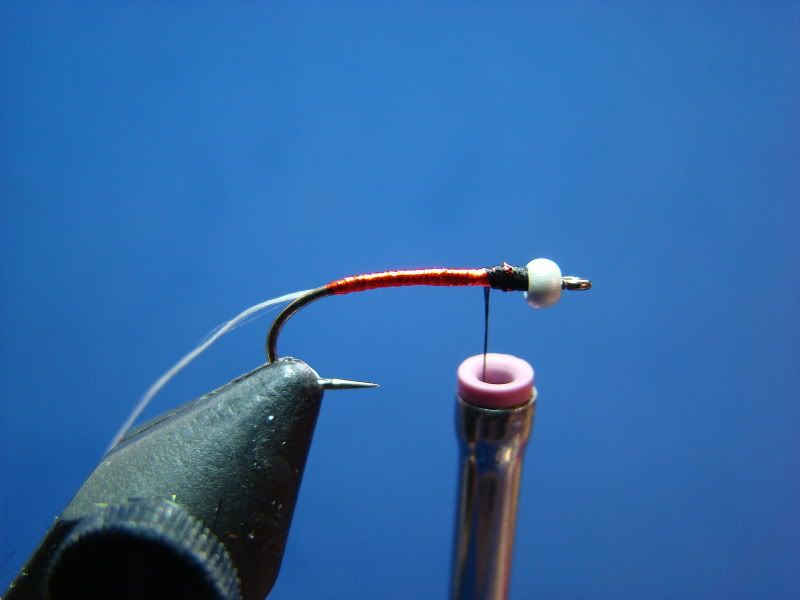
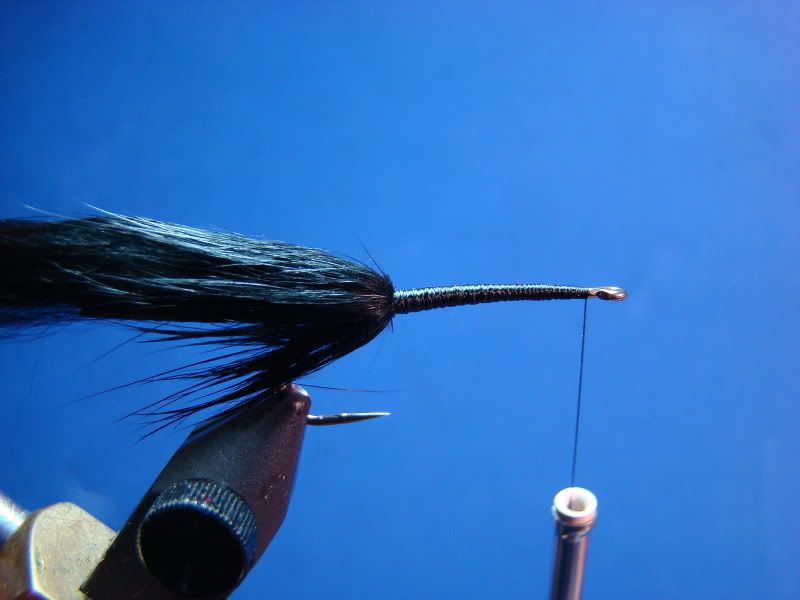
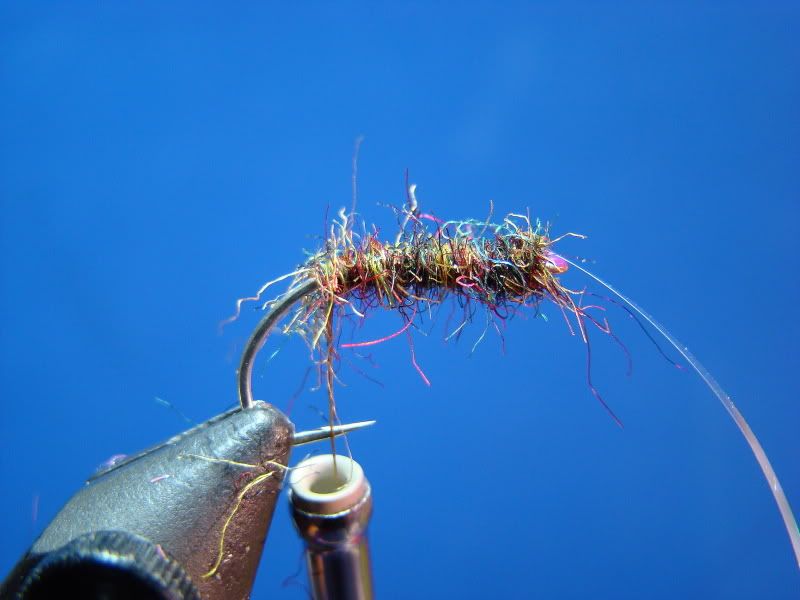

Whip finish and cut thread.


Step 3:

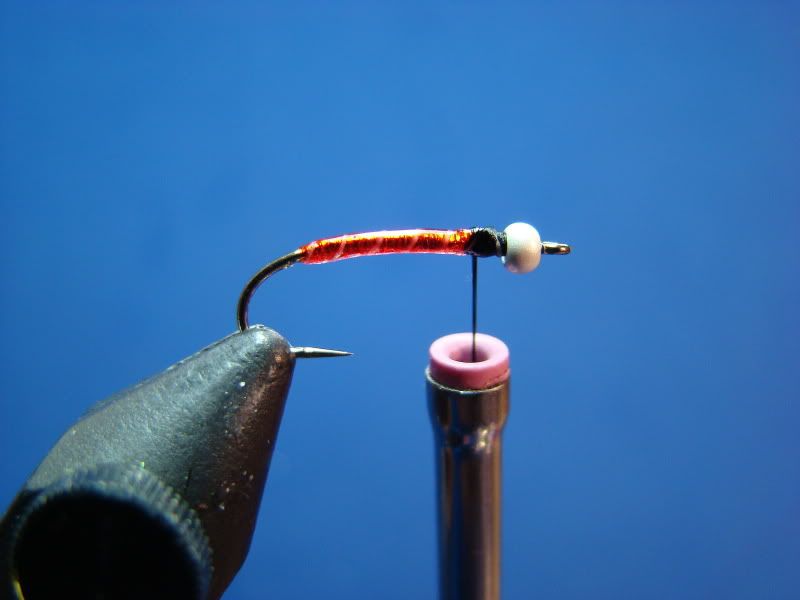
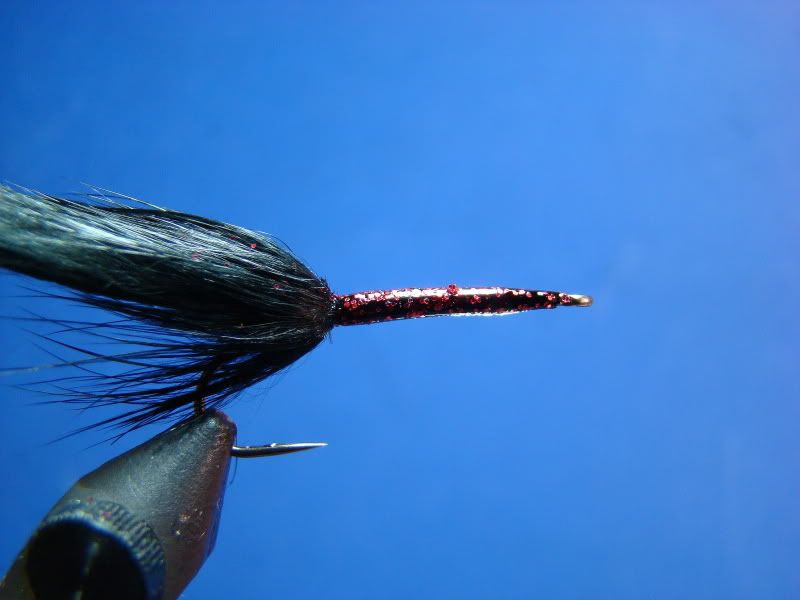
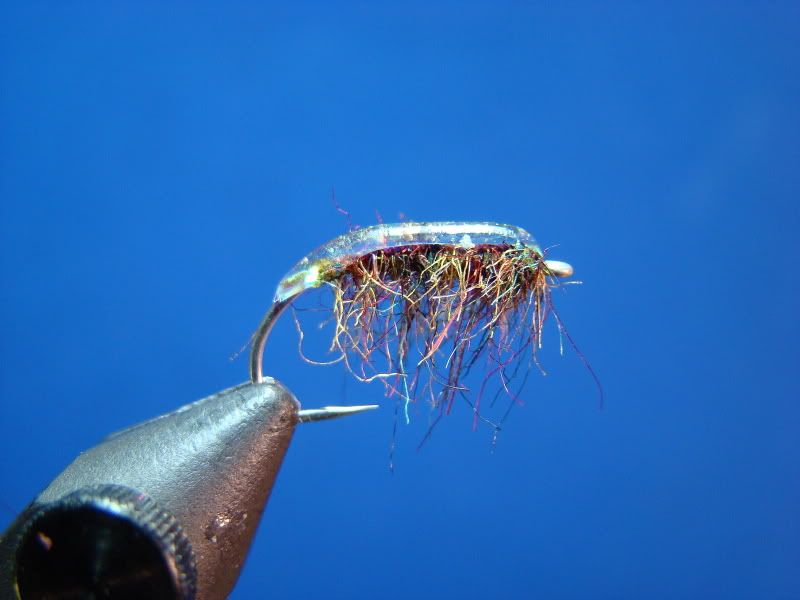
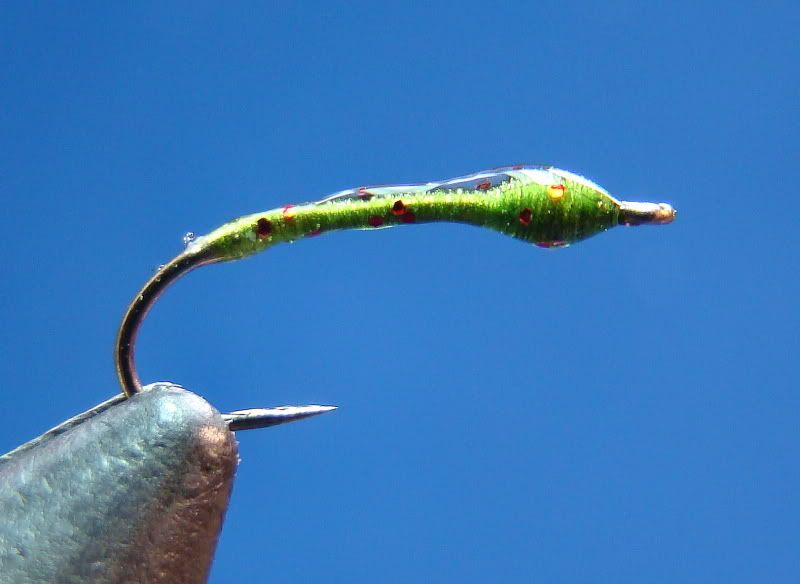
Apply a very thin coating of Clear Cure Goo over thread body and thorax.  Sprinkle a small amount or fine red or pearl glitter over resin.  Cure resin with ultra violet light.


Step 4:

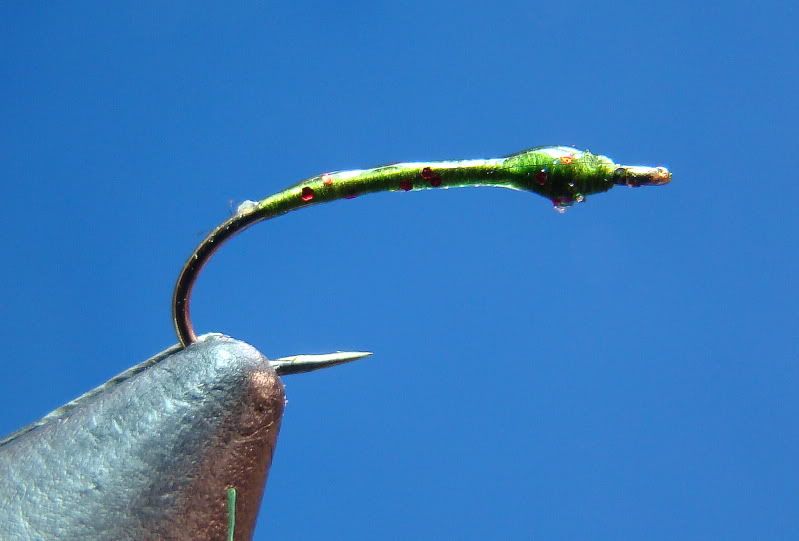
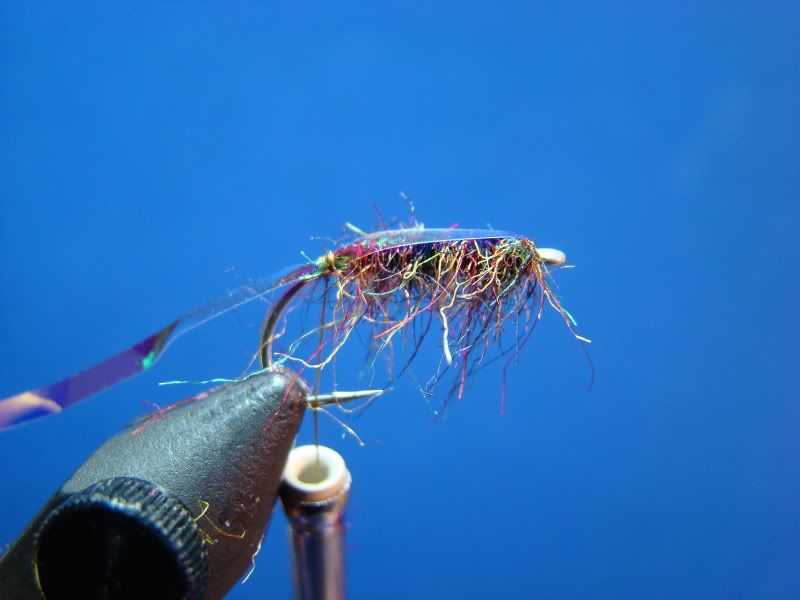
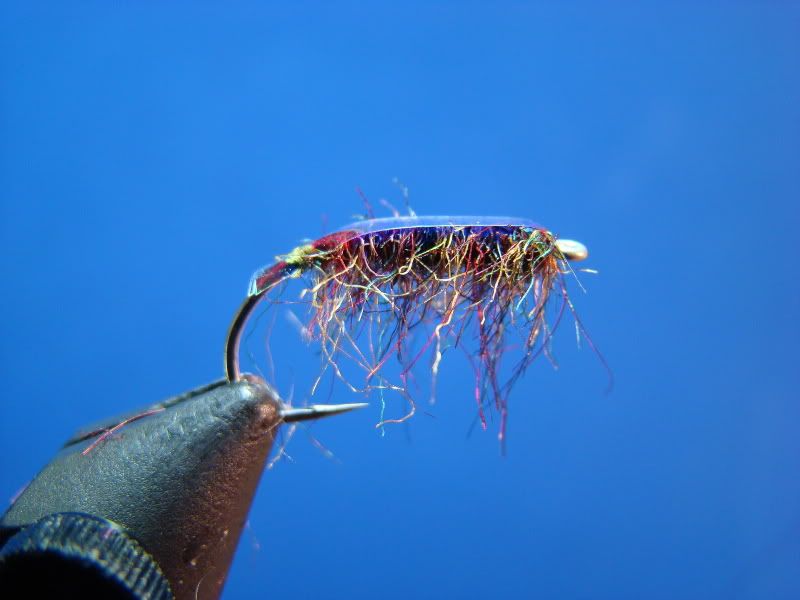
Apply a second coating of Clear Cure Goo and cure.  The finish after curing will be somewhat tacky.  Apply a very thin coating of Sally Hansen's Hard as Nails polish over the resin to correct this.


Perhaps the first thing you'll notice about this fly is the uneven coating.  You don't need to be absolutely perfect.  In fact, you'll find that an irregular coating produces more fish.  I surmise it has to do with light reflection like the naturals.

These glitter patterns can be tied in a wide array of colors, but I keep my selection simple: black, olive and red.  I would also recommend trying various colors of glitter. 

Enjoy!


Tuesday, March 6, 2012

JAB's Frostbite Midge

I know first hand there are plenty of hardcore anglers that fish our year-around lakes, and many are thinking isn't it a little too late to post midge patterns, but with the lowland lake season opener fast approaching I felt this would be a good time to introduce a few midge patterns to the blog.  Just like the old saying, "There's never a bad time to fish a midge," I guess there never a bad time to post a pattern...  especially if a beginner is reading and learning to tie.  With that out of the way, I'll concentrate on tying some midge patterns over the course of the month.
  
The Frostbite Midge has been my staple for many years.  Tied in the more earthy colors wound over silver tinsel this midge pattern is deadly.  In fact, I wouldn't hesitate to fish tie and fish pink, purple, blue, or chartreuse either. 

For those tiers wondering about patterns for the streams, you can simply scale these patterns to smaller hooks and expect the same results. 

Materials:

Hook:  Daiichi 1260 Size 8-16 (Pictured is sie 14) and 5/32 white brass bead
Thread: 8/0 red or black
Rib: 6/0 white thread
Underbody: Silver Flashabou
Body: Bright red Frostbite
Thorax: 70/30 mixture of red and black Halo dubbing (very fine Antron)

Step 1:

Secure hook in vise.  Start thread immediately behind the bead and build a hump.  Push hump inside the bead.


Step 2:

Tie in silver Flashabou and white 6/0 thread.


Step 3:

Wrap Flashabou back past the barb and return.  The Flashabou will provide a brilliant glow through the transparent Frostbite.


Step 4:

Tie in Frostbite.  Wind back to the end of the silver Flashabou and return to thorax area.


Step 5:

Wrap ribbing forward.


Step 6:

Coat the body with Sally Hansen Hard as Nail polish, epoxy, or Clear Cure Goo.


Step 7:

Dub small thorax.  Whip finish.  Completed!


Midges are simple, fun to tie, and you can complete a lot of them in a short period of time.  Fill up those boxes with various sizes and colors: black, red, brown, olive, cream, and tan. 

If you bring a little patience to the lake you will certainly be rewarding!

Enjoy!

Monday, March 5, 2012

The Devil's Advocate (Leech Pattern)

The Devil's Advocate receive it's indoctrination in a place most people wouldn't believe if they saw the event take place themselves.  After a very fishless morning in 25-degree weather using every traditional pattern known to catch fish in these renowned waters, I decided to try something a little off the wall.  I have had great days using Wooly Buggers at this location, especially in white, but this leech pattern was a little odd yet decided to give it a shot.  What did I have to lose?

I originally designed the Devil's Advocate for the stunted largemouth bass in the lake I once lived on for the coming spring.  Sure enough... the Rocky Ford fish attacked the Devil's Advocate with vengence.  The rest is, as the old saying goes... history!

Materials:

Hook:  Daiichi 1260 (pictured size 6)
Thread: 6/0 Black (or color of tail/collar)
Tail:  Rabbit strip
Collar:  Rabbit spun in a dubing loop
Body: Thread built up in a taper and covered with epoxy, Clear Cure Goo, or Liquid Fusion.
(Glitter may be added.) I have sprinkled red glitter over a thin coat of Clear Cure Goo, cured the first coat, and then applied a second clear coat.

Step 1:

Place hook in vise.  Start thread approximately two eye lengths behind eye.  This will help build a smooth transition in the taper.


Step 2:

Tie in rabbit strip.  The length of strip is determined by the hook shank.  The hide portion of the strip should equal the hook shank. 


Step 3:

Make a dubbing loop and wax thread.  Apply hair in loop and spin.  Hairs should protrude at 90-degree angles from the thread.  Trapped fibers should be picked out with your bodkin.  Length of collar is a personal choice, but I prefer a distance of half a tail length.  This will add a beautiful action to the fly.


Step 4

Wrap a collar to hide the tail's thread hump.  Two or three turns should be sufficient.


Step 5

Build a thread taper over the hook shank.


Step 6

Apply a coating over the thread taper and allow to dry/cure.   I have elected to use a very thin coating Clear Cure Goo sprinkled with red glitter before curing.  Once an even coating of Clear Cure Goo and glitters has been applied, I cured the coating with an UV light. 


Apply a second, clear coat- no glitter and cure.  Finished!


The Devil's Advocate can be tied in numerous colors.  The standard black, purple, olive, and red colors are deadly for lake fishing!  Another note to mention is the utilization of different size rabbit strips- not only in length, but magnum or mirco widths according to species targeted and hook size. 

Have fun with this pattern.  It can be deadly!

Enjoy!


Wednesday, February 29, 2012

Clouser Minnow

I'll finish up the month with Puget Sound's most popular streamer pattern- the Clouser Minnow.  I won't spend a lot of time writing about the history of the most famous streamer pattern in existence.  There's absolutely no need to here- it would take days, if not weeks, perhaps months, or even years! 

The Clouser Minnow's pedigree is long, distinctive, and rest assured, will live on for generations to come.  I highly doubt there will ever be another streamer pattern to surpass the Clouser's legacy. 

If you fish Puget Sound, or any freshwater/saltwater destination, the Clouser Minnow is a MUST HAVE fly!

Material:

The myriad of materials used are numerous.  Everyone seems to have a favorite and I am no exception!  Here's what I utilized, and normally use, for fishing and this step-by-step pictorial:

Thread:  Uni-thread Mono, clear, 4m
Hook: Daiichi 2546 #6
Eyes:  Spirit River Real-eyes Plus, Nickel/Pearl, 5/32"
Wing (bottom):  White australian sheep
Wing (top):  White autralian sheep over a few strands of UV Minnow Belly.
Topping: Black Light Angel Hair

Step 1:

Place hook in vise.  Wind a single layer of thread at approximately 1/3 of the hook length.


Step 2:

Place eyes over the layer of thread and make a few figure 8 wraps to ensure proper position.  If satisfied with positioning, apply a small drop of Zap-A-Gap to thread wraps.  Continue with firm wraps and super glue as necessary.


Step 3:

Tie in a small bunch of australian sheep behind the eyes and secure with wraps winding to the hook bend and returning to the starting point.  Wind thread forward of the eyes.  Bring butt ends over the eyes and secure bottom wing.


Step 4:

Remove hook from vise.  Place fly upside down in vise and lock in place.  Tie in a few strands of UV Minnow Belly in at the mid way point.  Lock material in place by bring the UV Minnow Belly back over the eyes.


Step 5:

Tie in top wing.  Use a little more hair to provide more profile.  The hair should be slightly longer than the bottom wing.


Step 6:

Tie in approximately 15 to 25 strands of Angel Hair at the midway point.  Lock in place by bringing the Angel Hair back over the eyes.  Build a small but proportionate head with thread.  The Angel Hair should be visible through the thread wraps.  Apply a few coats of head cement (or apply a single coat of epoxy). 


Finshed!


A couple things to keep in mind:

1)  Do not tie the eyes too close to the hook eye.   The number one mistake most tiers make.
2)  Tie the wing(s) sparse. 

If you haven't had a chance to hit the "Benchside Fly Tyer's" "Like" button on Facebook now would be a great time to do so...  I will be drawing a name around 4PM ( 01 March) for a large patch of australian sheep.

Enjoy!


Friday, February 24, 2012

JAB's Kelp Hopper (Isopod)

I won't put you to sleep writing about the particulars of isopods, there is plenty of literature to do that for me, but they do resemble the pill bug we played with as kids (curled into a ball).  A quick rule of thumb for chosing a color to fish is simply looking to the water.  Use various shades of brown to brownish red in areas of kelp and shades of olive to brownish olive patterns in vicinity of eel grass or rockweed.  The size of isopods vary from minute to 1 1/2-inches within Puget Sound, and though  some anglers (including myself) tie patterns in the #14-#20 range, I have had much better results utilizing patterns in #6 or #8. 

The best news.... if you can tie a freshwater scud pattern you are in business in short order!

Materials

Hook:  Gamakatsu SC15 (Size 6 or 8)(Size 6 pictured)
Thread:  Color to match body
Body:  Various shades of olive to brown.  I mix Mr. Peacock (spectrumize) Dubbing and Arizona Peacock dubbing to produce many vivid shades of the aforementioned colors
Shellback:  Mirage Flashabou coated with Clear Cure Goo or Liquid Fusion.


Step 1:

Start thread just behind the eye and wind to the bend.


Step 2:

Tie in Mirage Flashabou and wrap forward butting the eye.


Step 3:

Apply dubbing to the thread and wind just past the bend.


Step 4:

Bring Mirage Flashabou back over the body and secure with a whip finish behind the body.


Step 5:

Hold shellback straight out, parallel with shank, and cut even with the bend of the hook.  The shellbeack with follow the contour of the bend.  Cut thread. 


Step 6:

Apply Clear Cure Goo or Liquid Fusion on entire shellbeck.  You are ready to fish!


Enjoy!

Monday, February 20, 2012

JAB's Sand Lance

I have seen a lot of different sand lance patterns over the years.  The most successful patterns are tied with a thin profile, possess unparalleled movement, translucency, or a combination of all three- realistic for these eel-like fish.   The myriad of material combinations are endless however, it will appear over time the simple ties are the most effective.    

My own JAB's Sand Lance has been a phenomenal producer.  The tying techniques are nothing special; therefore, this is a great fly to learn how to tie sand lance patterns.  However, the uniqueness comes from the wing material- australian sheep.  The hair is extremely translucent, wispy, and possesses great movement in the water.  In fact, I have been steadily replacing arctic fox, marabou, and some synthetics with australian sheep for my small harwing style patterns.

Should you decided to spend any amount of time throwing flies in the saltchuck it is highly recommended that you carry a few sand lance patterns.  They flat out produce!

Lastly,  by shortening the wing and adding a little more bulk you can effectively convert this into herring, sardine, or anchovy pattern. 

Materials:

Hook:  Gamakatsu SC15 (Size 4-8) (pictured is a size 6)
Thread:  Uni- mono, clear/fine, size 4m
Wing:  Australian sheep mixed with 4 to 6 strands of UV Minnow Belly or UV Lite Brite
Topping:  Baitfish or peacock (color) Angel Hair
Eyes:  Pearl 1.5 coated with Liquid Fusion

Step 1:

Start mono thread approximately one half eye length behing hook's eye.  Wrap towards the rear approximately 15-turns.  Apply a small drop of Zap-A-Gap.  This will keep the wing from spinning over the hook shank.


Step 2:

Select a small amount of australian sheep from patch.  Comb out shorter hairs.  Cut 4 to 6 strands of UV Minnow Bellow (or similiar) and mix into the wing.  A quick way to mix the two materials is combing the UV Minnow Belly into the hair, or you can also use the "rolled" method.  "Rolling" is best described as folding the material over itself until the two materials are equally mixed.  When satisfied with the correct amount and mixed material cut a slight taper at the butt end of the hair.  This will alleviate a sharp cut off point (or hump) at the tie in point.  Secure with tight turns of mono thread. (Do not use excessive turns of mono thread to secure wing- keep it thin.)  The length of the wing is approximately 5-hook lengths.


Step 3


Select approximately 15 to 20 strands of Angel Hair and tie in at the mid way point (as pictured).   The wraps should be tight to the eye.  Once secured bring the Angel Hair back over the wing and wrap close intervals to the rear.  Whip finish and cut mono thread.


Step 4:

Remove an eye from backing and place into position.  Repeat for opposite side.  There are many ways to place adhesive eyes, but I find it easiest to use my bodkin.  Normally the head of a fly would be a slightly larger diameter than pictured making eye placement easier.  However, since we need to maintain a thin profile the eyes probably will not fully adhere to the contour of the head (as pictured).  However, I have a solution!

Apply a small portion of Liquid Fusion like you would epoxy.  One the greatest attributes this urethene glue has is it's shrinking nature when drying.  Therefore, the eyes will receded onto the thread during the drying/curing phase.


Freshly applied Liquid Fusion.


Cured and ready to fish!


Enjoy!

Are you new the The Benchside?  Now would be a good time to mention I am giving away a nice patch of australian sheep on my Facebook page (The Benchside Fly Tyer).  All you need to do is hit my page's "like" button and the "like " button under the Squidley Do-Right fly.  I'll will pick someone at the end of the month.  This material is absolutely gorgeous!